Screen Capture
Screen capture is easy with Snipping Tool that is included in Windows 10.
Method A: Keyboard shortcuts
1A. Start Snipping Tool from a shortcut: On the keyboard, press the key combination Shift + [Windows key ![]() ] + S.
] + S.
2A. Snipping Tool freezes and darkens your display. Snipping tool window appears in the top of the display.
3A. Select the screen capture type you want from the Snipping Tool menu.
4A. Make a screen capture by dragging the mouse while pressing the left button on the mouse over the area that you want to capture. The captured area is displayed brighther.
5A. Continue as explained in Saving picture (below).
Method B: Find Snipping Tool in Windows menu
1B. Click on the magnifying glass icon in the lower left of the screen.
2B. Find Snipping Tool and open it:

3B. Snipping Tool window opens and you can select the screen capture type you want from the Snipping Tool menu.
4B. Click on New to start a new screen capture. Make a screen capture by dragging the mouse while pressing the left button on the mouse over the area that you want to capture. The captured area is displayed brighter.
5B. Make a screen capture by clicking on New:
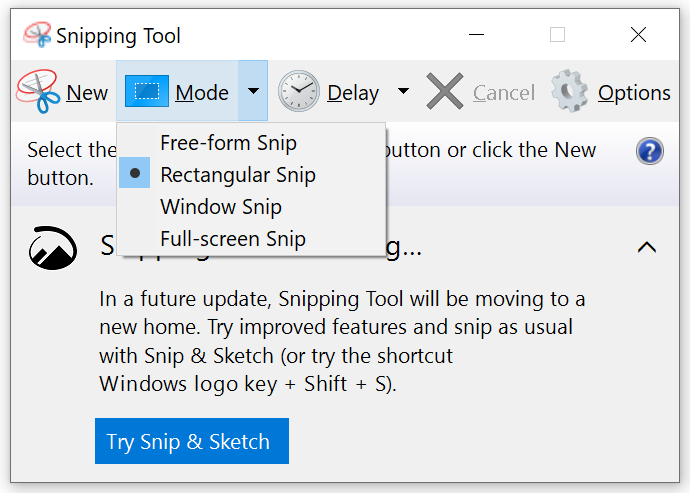
Select in Snipping Tool settings what is captured:
- Free-form snip - draw a free-form shape to select an area
- Rectangular snip captures a rectangular area drawn with the mouse
- Windows snip captures the window selected with the mouse (usually the best option)
- Full-screen snip captures the whole screen
To select a window with Windows snip just click on a window.
Save a picture
Method A
- A screen capture made with a keyboard shortcut is saved in the computer's clipboard and can be attached to a message by pressing Ctrl + V (Paste).
- If you want to edit the picture you can open it e.g. in Paint or other picture editing program by pressing Ctrl + V (Liitä).
- In Paint you can save screen capture by File > Save as > Save.
Method B
- A picture made with Snipping Tool opens in Snipping Tool editor program with which you can edit the picture. You can undo edits with Eraser.
- A finished screen capture is saved by pressing File > Save as > Save.

After this the screen capture is ready to be attached to an email or service request.
Did you encounter a problem?
- Restart your computer and the device where the issue is occurring. Try the function again.
- If the function you are attempting is happening in a web browser, try the function again in an incognito or private window and in a different browser.
- Try searching for a solution on the site of the IT Services by using the following search methods:
- navigation menu of the site (on the left)
- search machine of the wiki (right upper corner)
- a general search engine, for instance Google Search
- alphabetical index
- FAQ
If the problem is not resolved, please contact the helpdesk according to best practices. Always include a full screen screenshot of the issue in your service request.
| Contact method | Contact information |
|---|---|
| Form | |
| Phone service | +358 9 7424 6777 (weekdays from 8 am to 4 pm) |